Migrate web hosting from Yahoo to Amazon
Abstract
Instructions on how to move your static web site from Yahoo to Amazon.
Alternatively, you can most probably use a sub-set of this posting if you just want to host a new static web site on Amazon (though there are other guides for that).
Alternatively, you can most probably use a sub-set of this posting if you just want to host a new static web site on Amazon (though there are other guides for that).
Overview
I've had simple static home page since 1995. This was initially on Geocities and then Yahoo bought them out. Over time new features came out and the price remained about the same. A lot of other providers have come onto the market since 1995. Since I wasn't using the available features of the Yahoo service (i.e. PHP, marketing, guestbook etc.) a change to another provider (more closely aligned with what I needed) was long overdue.The features I was using included...
- Hosting (just static files)
- Domain name registration (and associated DNS services)
- FTP (I'd commonly use it just to transfer files between computers - unrelated to my site)
- e-Blogger (i.e. this blogging service)
Replacement
For replacement hosting, I decided to go with Amazon Web Services (AWS) for the following reasons...
- S3 is a good service for hosting files. It's cheap, scalable, available and has high durability (eleven 9s - i.e. 99.999999999% reliability)
- I can just as easily use S3 to transfer files as I could use FTP (there are also other options for that now such as dropbox etc.)
- Route 53 provides a great DNS service that allows me to create sub-domains and hook up blogging
For a replacement domain name registrar I decided to go with Cheap Domains. It has the features I needed, is Australian and I guess the name says it all.
Pricing
S3 and Route 53 cost a little bit of money. They are pay as you use them. Check the pricing on them however and understand it. I think you'll find it substantially cheaper than the $11 month I was paying with Yahoo (e.g. less than $1/month).
Cheap domains is $7 per year for a .com address and another $7 if you want to keep the whois information on it private.
Assumptions
- I'm assuming you're using Windows for this posting. You can probably do most of it on any platform but some steps and/or tools would need to be substituted for your particular OS.
Pre-requisites
- An existing Yahoo web-hosting account to transfer from (the whole point of this post)
- WinSCP (to download your current site from Yahoo via ftp). Download it here
- An AWS account (see the following for creating one if unsure Create AWS account)
- An account with a new domain registrar (I used Cheap Domains)
- A web site editor to remove some Yahoo stuff (I use sublime text, any text editor will do)
- S3 Browser (a nice way to use S3). Download it here
- S3Sync (to use for syncing on-going changes to your site). Download it here
High level steps
- Get the site working on AWS without messing with the Yahoo version
- Point Yahoo infrastructure at AWS
- Transfer domain to new registrar
- Cancel Yahoo service
Detailed steps
1. Initial notes
You can't have moved your domain in the last 60 days. This is against ICANN rules. I'm not sure what happens if you try (you're probably prevented from doing it by the current and the new registrar).
2. Download your files to your local machine
Firstly, we want to download the files that comprise the Yahoo hosted web site. To do this, I suggest using an FTP Client (I mean other than command line). The one I suggest is WinSCP. WinSCP is generally handy for AWS since it supports SSH as well which you might like to use for EC2 at some point (we don't need SSH for this posting however).
After you install WinSCP, run it up and enter in your ftp login details to your Yahoo web site. Once you login, you'll have the remote site shown in the right pane and your local drive shown in the left pane. I created a folder on the left pane (e.g. my-very-own-website-files) and selected everything on the right pane and dragged it into the folder on the left. It took about an hour to download (my site was only around ~30MB but all the other stuff I had accumulated through file transferring was over a GB). Note this doesn't remove anything from the server (just makes a local copy of it).
 |
| WinSCP Screenshot (just a random one - not me) |
3. Modify files (remove Yahoo specific stuff)
Some of my files had been modified by Yahoo on the server side after I had originally uploaded them. For example my index.html file had some server side javascript tag added after the closing body tag. I suspect this has to do with counters and/or usage statistics. Possibly it was the cause of that infuriating downloading aspect of some Yahoo hosted web pages (i.e. the browser tab indicated it is still downloading long after everything is visible on the page).
Anyway, it's not needed anymore and it needs to be deleted. I suggest checking a few of your html files starting with your default file (i.e. index.html). Find any offending scripts (start at the bottom of the page for the one I just mentioned) and remove them. This is where a good editor like Dreamweaver can come in handy. I'm quite happy using sublime text however (generally useful editor).
Now would also be a good time to check for any other Yahoo specific scripts, css, hyperlinks etc. that you may have forgotten about (guestbook, counters etc.). You'll need to remove all of them. Before I considered uploading my site, I got it working properly off the local hard-drive first (which you should be able to do if it's a purely static site).
If you discover that you're actually using a lot more of Yahoo's stuff than you realized then now is a good time to re-consider what you're doing. You've done no harm if you decide to stop now.
4. Move any unnecessary files out of your local copy
This step is only needed if you used your Yahoo web site as a dumping ground to transfer files between machines like I did. At this stage I moved the files that didn't relate to my web site to a separate directory (you probably don't have this problem but just in case). After I did this, the size of my web site had shrunk from over a GB to about 30MB. I'm still going to upload a lot of that other stuff that doesn't relate to my web site but it's unrelated to this posting (I'm going to use a separate S3 bucket for that stuff and use S3 Browser - I'll talk more about these tools later in this posting).
5. Configure S3 browser
If you haven't used 'S3 Browser' previously, you'll need to configure it with your AWS account. You can skip this step if you've already configured it previously.
If this is the case, you need to give it an account name and enter credentials. For account name I used my Amazon login email address. You're free to enter what ever you want however.
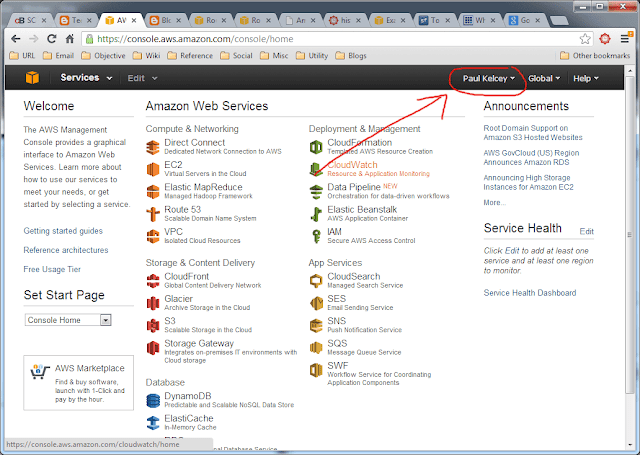
To find out what the necessary credentials are, you need to go to aws.amazon.com, hover over My Account/Console link (at the top near the right) and click 'AWS Management Console' in the pop-up menu. You'll then need to enter your regular Amazon username and password and eventually you should see a console screen that lists a bunch of links and icons in a grid pointing to various services (e.g. EC2, S3 etc.).
 |
| S3 Browser - Create new account |
To find out what the necessary credentials are, you need to go to aws.amazon.com, hover over My Account/Console link (at the top near the right) and click 'AWS Management Console' in the pop-up menu. You'll then need to enter your regular Amazon username and password and eventually you should see a console screen that lists a bunch of links and icons in a grid pointing to various services (e.g. EC2, S3 etc.).
Ignore all of that and at the top right of the page in the header you should see your name. It's in the black title area to the left of the words Global and Help.
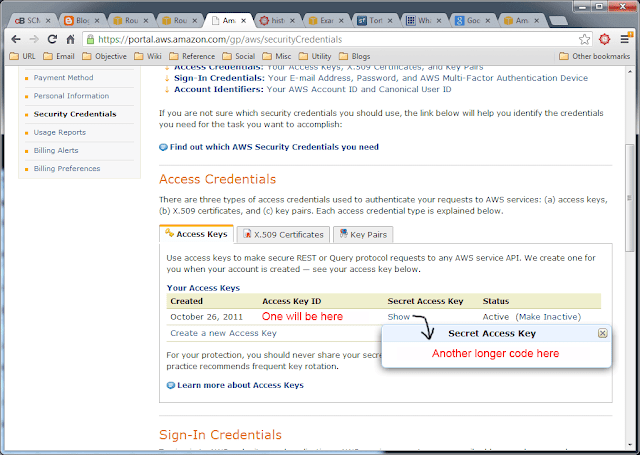
Click your name and then click 'Security Credentials' in the pop-up menu. You might be asked to login again here for security reasons (or not). Eventually you'll come to a new page. Down the page should be a heading called Access Credentials and under that a tabbed pane with three tabs.
The first tab (already open) is called Access Keys and this is what you need. In the picture above I've replaced my codes with some red text. Double click the Access Key ID field to select it all and copy it to the clipboard (ctrl+c). Then go back to S3 browser and paste that into the appropriate field. Do the same for Secret Access Key (note that in the AWS web site you'll need to press the "Show" link to show your Secret Access Key before you can double click, copy etc.).
You'll note that at the bottom of the S3 Browser window there's a check-box that asks whether you want S3 Browser to encrypt the credentials you've provided. I think this is a good idea. I just used my Amazon password as the encryption key. I figure if anyone has my password they can get the credentials anyway so just have one point of vuneralibility.
 |
| AWS Console |
Click your name and then click 'Security Credentials' in the pop-up menu. You might be asked to login again here for security reasons (or not). Eventually you'll come to a new page. Down the page should be a heading called Access Credentials and under that a tabbed pane with three tabs.
 |
| AWS Credentials |
The first tab (already open) is called Access Keys and this is what you need. In the picture above I've replaced my codes with some red text. Double click the Access Key ID field to select it all and copy it to the clipboard (ctrl+c). Then go back to S3 browser and paste that into the appropriate field. Do the same for Secret Access Key (note that in the AWS web site you'll need to press the "Show" link to show your Secret Access Key before you can double click, copy etc.).
You'll note that at the bottom of the S3 Browser window there's a check-box that asks whether you want S3 Browser to encrypt the credentials you've provided. I think this is a good idea. I just used my Amazon password as the encryption key. I figure if anyone has my password they can get the credentials anyway so just have one point of vuneralibility.
6. Create an S3 bucket to host and serve the web site files
Launch 'S3 browser' (if not running already). After S3 Browser launches up, it shows you whatever buckets you've created previously. If you've not used S3 before then there will be no buckets. A bucket is just a uniquely named (globally unique) container for files.
The first one is for the web site files and will be called something like 'my-very-own-website.com'. Use the appropriate name for your web site here instead of 'my-very-own-website.com'. The same applies for the rest of this blog post when you see it. You should give it the same name as your domain name (e.g. pkelcey.com). This bucket will hold all the files for your site. To create it, press the 'New Bucket' button in S3 Browser.
Once it's been created you'll see it in the list (unlike the screen shot below, it's probably the only thing in your list).
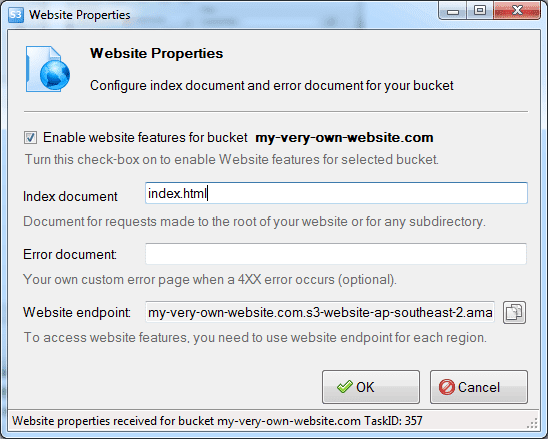
Right click it and select 'Edit Website Properties' in the pop-up menu (about half-way down). A new window will open. Click the checkbox labelled 'enable web site features...' and then enter 'index.html' (or whatever your root html file is called) in the first text area. You can also (optionally) create an error html page if you want but I didn't do this. Before pressing the OK button, it's worth copying the link in the third field either into a separate browser address bar (don't hit enter yet though) or into a text file. It will save you loading this screen again to get it later. It will have a URL like 'my-very-own-website.com.s3-website-ap-southeast-2.amazonaws.com'.
After you've pressed OK and closed the 'Edit Website Properties' window, the next thing to do is make the bucket public (for read-only access). Do this by left clicking the bucket in the list and then selecting the 'Sharing and Security' tab in the tabbed pane underneath (this is the second tab). Press the 'Make Public' button down the bottom left of this tab.
 |
| S3 Browser - Create bucket |
Once it's been created you'll see it in the list (unlike the screen shot below, it's probably the only thing in your list).
 |
| S3 Browser - New bucket created |
Right click it and select 'Edit Website Properties' in the pop-up menu (about half-way down). A new window will open. Click the checkbox labelled 'enable web site features...' and then enter 'index.html' (or whatever your root html file is called) in the first text area. You can also (optionally) create an error html page if you want but I didn't do this. Before pressing the OK button, it's worth copying the link in the third field either into a separate browser address bar (don't hit enter yet though) or into a text file. It will save you loading this screen again to get it later. It will have a URL like 'my-very-own-website.com.s3-website-ap-southeast-2.amazonaws.com'.
 |
| S3 Browser - Make a bucket a web site |
After you've pressed OK and closed the 'Edit Website Properties' window, the next thing to do is make the bucket public (for read-only access). Do this by left clicking the bucket in the list and then selecting the 'Sharing and Security' tab in the tabbed pane underneath (this is the second tab). Press the 'Make Public' button down the bottom left of this tab.
 |
| S3 Browser - Make bucket public |
7. Upload your files to the bucket
Next (using Window's explorer) navigate your hard-drive to where you stored the local copy of your web site that you downloaded (and possibly fixed) in steps 2 and 3 above. I like to tile the two windows (Window's explorer and S3 browser) beside one another by pressing the windows key + left arrow and windows key + right arrow respectively on each window.
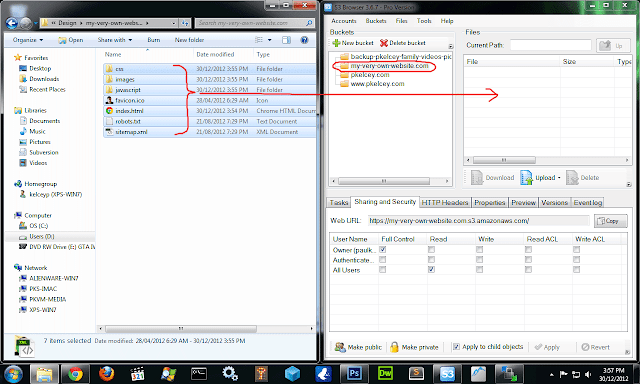
Anyway, make sure the 'my-very-own-website.com' (or whatever it's called) bucket is selected in S3 browser. Then select all the web site files in windows explorer and drag them to the pane to the right of the bucket in S3 browser. This should start an upload process which might take some time.
Once that's done (you can monitor the tasks tab in S3 Browser) you should be able to press enter in the address bar of the browser with something like 'my-very-own-website.com.s3-website-ap-southeast-2.amazonaws.com' in it's address bar. This should now show you your static web site being served from S3.
That's some encouraging progress but it's not yet at the right domain address, there's no re-direction from the www version of the address (i.e. www.my-very-own-website.com) and we've still got the Yahoo version of the site so there's plenty more work to do.
Anyway, make sure the 'my-very-own-website.com' (or whatever it's called) bucket is selected in S3 browser. Then select all the web site files in windows explorer and drag them to the pane to the right of the bucket in S3 browser. This should start an upload process which might take some time.
 |
| Window's explorer and S3 Browser - drag and drop the local site files to S3 bucket |
Once that's done (you can monitor the tasks tab in S3 Browser) you should be able to press enter in the address bar of the browser with something like 'my-very-own-website.com.s3-website-ap-southeast-2.amazonaws.com' in it's address bar. This should now show you your static web site being served from S3.
That's some encouraging progress but it's not yet at the right domain address, there's no re-direction from the www version of the address (i.e. www.my-very-own-website.com) and we've still got the Yahoo version of the site so there's plenty more work to do.
8. Create a new bucket that re-directs www. sub-domain version
We need to create a second bucket to re-direct requests from the www. sub-domain of your site to the domain we specified above. For example, redirect from 'www.my-very-own-website.com' (i.e. starts with www) to 'my-very-own-website.com' (i.e. without the www sub-domain).
In S3 Browser click 'New Bucket' again and this time name it something like 'www.my-very-own-website.com' (i.e. just put www. in front of whatever name you created in the above step).
You should see the new bucket appear in the list.
For this next step, we need switch from S3 Browser to using the AWS Console in the web browser. I couldn't find a way to do this in 'S3 browser' so let me know if there is a way. Load a web browser window if you don't have one handy already.
In the 'configure S3 Browser' step shown a few paragraphs above (step 5) there are some instructions to get to the AWS Console. Follow the steps up until it says 'Click your name at the top right'. Instead of doing that, we are going to click the S3 Service link.
In the web browser now you should now see your buckets. Click the little icon (looks like a magnifying glass over paper) to the left of your 'www.my-very-own-website.com' bucket. On the right of the page, you should see the properties of this bucket appear. I think the right terminology for this type of user interface is an accordion view. Click the 'Static Website Hosting' tab and it will expand showing three radio buttons.
Click the third one called 're-direct all traffic to another host name'. It will expand further and may even be intelligent enough to know to enter 'my-very-own-website.com' (or whatever) on your behalf. If not, enter in the appropriate value (i.e. the domain/bucket name entered previously - the one without www in front of it). Then press save (button is at the bottom).
We're in the S3 Service currently (from the above step) and we're going to go to Route 53. At the top left of the screen there is a link called 'Services'. Click that and a big pop-up window appears. At the bottom of the middle column of links is Route 53. Click that.
If you're here for the first time there's a welcome message and a link to create a hosted zone. Click the 'create hosted zone' button. On the right hand side of the screen you'll be prompted to enter a domain name and a comment. We're going to create just one hosted zone called something like 'my-very-own-website.com' (note that we'll create records for the www sub-domain in this as well). After you've entered the appropriate value (i.e. your equivalent of my-very-own-website.com) click the button called 'create hosted zone' (right at the bottom of the page in the same pane). Note that in your view you won't see the 'pkelcey.com' hosted zone.
Note that you can do this even though Yahoo is still the domain registrar for your domain 'my-very-own-website.com' and all requests to 'my-very-own-website.com' will still go through the Yahoo DNS naming servers to the Yahoo version of the site. Anyway, after you press 'create hosted zone' you'll see your new hosted zone appear. Make sure it's associated check-box is checked and then press 'Go to Record Sets'.
When you press 'Go to record sets' you'll see the following screen with two records already created.
Click 'Create Record Set'. There's no need to modify name and we don't need to change type since we're creating an A record and that's the default. Select the Alias radio button and then left click your mouse in the alias target field. As soon as you do that, a pop-up window of suggested aliases becomes available. Click the 'my-very-own-website.com-...' one. Then press 'Create Record Set' at the bottom of the pane.
Once you've clicked 'Create Record Set' the new A record will be created.
After you've created it, it should appear as follows.
The first note at the top of the Yahoo help page is to update the Yahoo naming servers. There are 4 naming servers that you want and these are listed in the Route 53 console.
After you login to Yahoo you'll eventually find your Domain Control Panel. I found with a combination of Googling and navigating. From the Domain Control Panel you can select advanced DNS options. From there you should delete the two Yahoo naming service references (you can paste them into a text file so you don't lose them if you like) and then add the 4 Amazon naming servers shown above (note that you'll most likely have different addresses to copy and paste).
The email from the new registrar will most likely provide a link back to their web site with a form that enables you to enter in the authorization code you gathered in step 13.
Each registrar will have a domain name dashboard. Once you've initiated the transfer and entered the authorization code, the domain you're moving will appear in the list. Initially it might say something like pending but reasonably quickly it will change to something like 'transferring'. I got the message that it would take up to 7 days to complete the transfer. In the meantime, the Yahoo infrastructure will be pointing to the Route 53 naming servers (we did this in step 12). At the time of writing this, I am currently waiting for the transfer to complete.
Anyway, that's the bulk of the posting. The remaining steps are if you're also transferring e-blogger sub-domains (which you would have had configured at Yahoo).
There's an option there to set the blog address (under publishing). If you click the edit tab then you can select advanced options and specify the sub-domain you want (e.g. my-blog.my-very-own-website.com). When you do this, blogger.com will complain that you need two CNAME entries in your DNS provider. One which maps from my-blog.my-very-own-website.com to ghs.google.com and another that maps from {a bunch of random characters}.my-blog.my-very-own-website.com to a big garbled URL.
Go to Route 53 and add those two records in as CNAME records and then go back to blogger.com and retry. It will work this time and when you go to my-blog.my-very-own-website.com you'll see the blog.
In S3 Browser click 'New Bucket' again and this time name it something like 'www.my-very-own-website.com' (i.e. just put www. in front of whatever name you created in the above step).
 |
| S3 browser - create second bucket |
You should see the new bucket appear in the list.
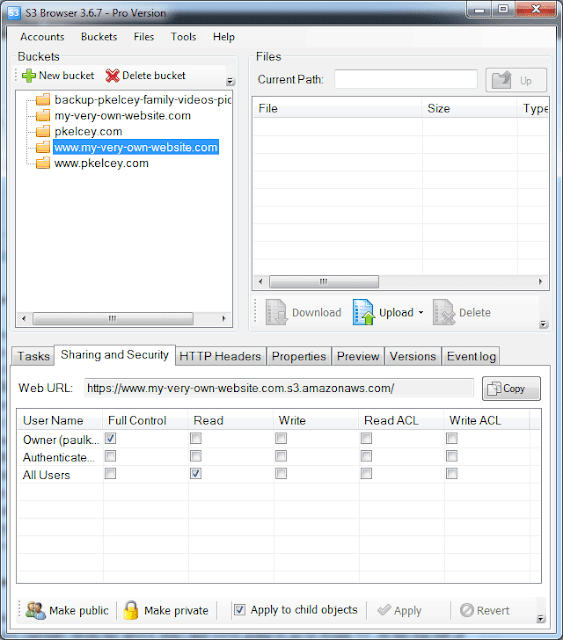 |
| S3 browser - second bucket created |
For this next step, we need switch from S3 Browser to using the AWS Console in the web browser. I couldn't find a way to do this in 'S3 browser' so let me know if there is a way. Load a web browser window if you don't have one handy already.
In the 'configure S3 Browser' step shown a few paragraphs above (step 5) there are some instructions to get to the AWS Console. Follow the steps up until it says 'Click your name at the top right'. Instead of doing that, we are going to click the S3 Service link.
 |
| AWS Console - Click S3 link |
In the web browser now you should now see your buckets. Click the little icon (looks like a magnifying glass over paper) to the left of your 'www.my-very-own-website.com' bucket. On the right of the page, you should see the properties of this bucket appear. I think the right terminology for this type of user interface is an accordion view. Click the 'Static Website Hosting' tab and it will expand showing three radio buttons.
 |
| AWS Console - S3 Service - Re-direct www bucket |
Click the third one called 're-direct all traffic to another host name'. It will expand further and may even be intelligent enough to know to enter 'my-very-own-website.com' (or whatever) on your behalf. If not, enter in the appropriate value (i.e. the domain/bucket name entered previously - the one without www in front of it). Then press save (button is at the bottom).
9. Create a hosted zone in Route 53
Since we're already in the AWS Console in the web browser, now's a good time to do the DNS records. We want to use Amazon's Route 53 Service to act as our DNS service. Route 53 will enable us to create appropriate DNS records to host a web page out of S3 using a registered domain name.We're in the S3 Service currently (from the above step) and we're going to go to Route 53. At the top left of the screen there is a link called 'Services'. Click that and a big pop-up window appears. At the bottom of the middle column of links is Route 53. Click that.
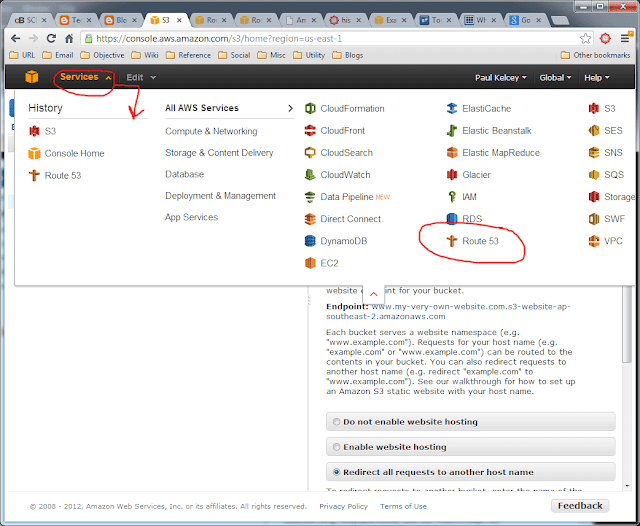 |
| AWS Console - Route 53 link |
If you're here for the first time there's a welcome message and a link to create a hosted zone. Click the 'create hosted zone' button. On the right hand side of the screen you'll be prompted to enter a domain name and a comment. We're going to create just one hosted zone called something like 'my-very-own-website.com' (note that we'll create records for the www sub-domain in this as well). After you've entered the appropriate value (i.e. your equivalent of my-very-own-website.com) click the button called 'create hosted zone' (right at the bottom of the page in the same pane). Note that in your view you won't see the 'pkelcey.com' hosted zone.
 |
| AWS Console - Route 53 - Create hosted zone |
Note that you can do this even though Yahoo is still the domain registrar for your domain 'my-very-own-website.com' and all requests to 'my-very-own-website.com' will still go through the Yahoo DNS naming servers to the Yahoo version of the site. Anyway, after you press 'create hosted zone' you'll see your new hosted zone appear. Make sure it's associated check-box is checked and then press 'Go to Record Sets'.
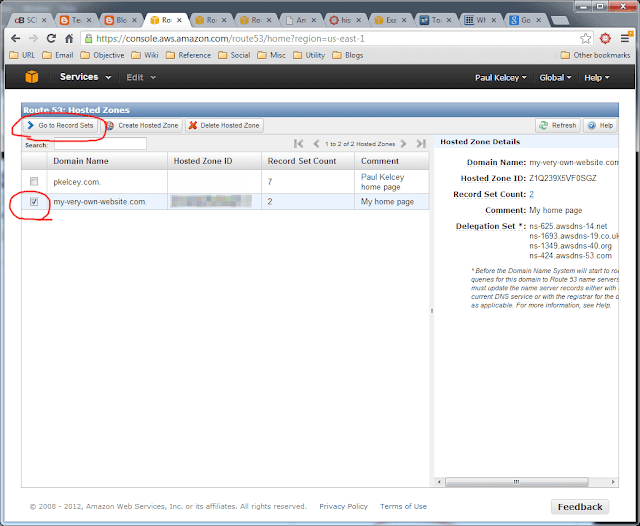 |
| AWS Console - Route 53 - Go to record sets |
When you press 'Go to record sets' you'll see the following screen with two records already created.
 |
| AWS Console - Route 53 Service - Two records created initially |
10. Create an A record
An A record (A stands for address) enables a host name (like 'my-very-own-website.com') to be converted to an IP address. In this case however we want to point it to our specific S3 end-point rather than say the IP address of the S3 Service itself (which is the same for everyone in a particular region). We can do that with Route 53 using an alias.Click 'Create Record Set'. There's no need to modify name and we don't need to change type since we're creating an A record and that's the default. Select the Alias radio button and then left click your mouse in the alias target field. As soon as you do that, a pop-up window of suggested aliases becomes available. Click the 'my-very-own-website.com-...' one. Then press 'Create Record Set' at the bottom of the pane.
 |
| AWS Console - Route 53 Service - Create A record alias |
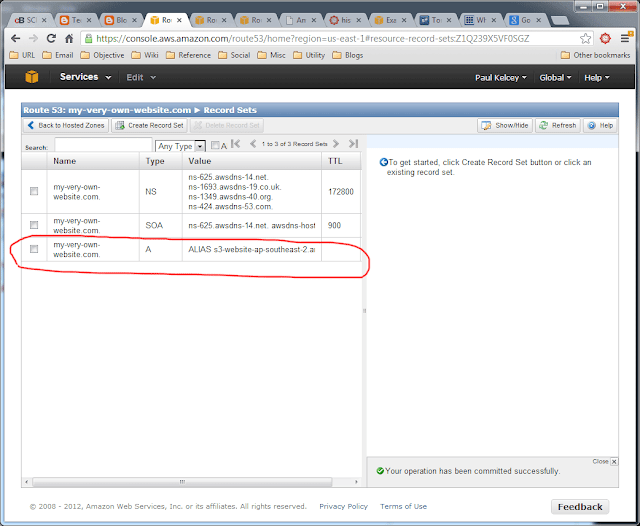 |
| AWS Console - Route 53 Service - A record created |
11. Create a CNAME record for the www sub-domain
Next we're going to create a CNAME record that will re-direct the www sub-domain to the S3 end point of the non-www domain address. To be honest I'm not sure why we need to do this at both the S3 layer and the Route 53 layer. These are the steps recommended by the page I've listed in the references section below and they worked for me. If you know why you have to do both let me know and I'll update this post. Anyway, we're going to create a new record, add the www sub-domain to the name, set the type to CNAME and then put in the S3 end-point for the first bucket we created. Finally press the 'Create Record Set' button at the bottom of the pane. See the picture below.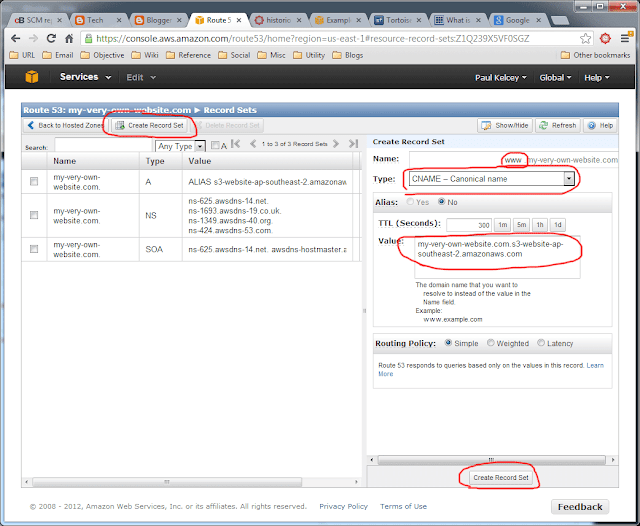 |
| AWS Console - Route 53 Service - Create CNAME record for www sub-domain |
After you've created it, it should appear as follows.
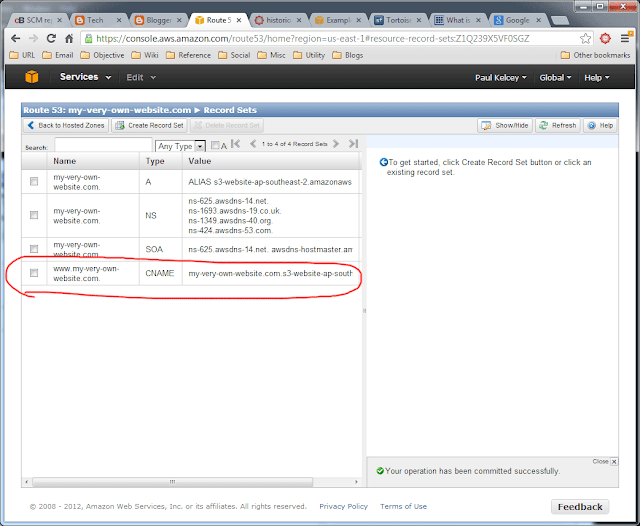 |
| AWS Console - Route 53 Service - CNAME record created |
We're done with Amazon for now. We can come back later to do things like add in CNAME re-direction for blogging services hosted at e-blogger. For example we might want blogs to appear at my-blog.my-very-own-website.com (e.g. news.pkelcey.com and tech.pkelcey.com). I'll stick with the essential stuff for the first pass (not everyone wanting to migrate will be using e-blogger for example).
12. Update Yahoo Name Servers
I just realized that I can't provide detailed information for this section because I've already cancelled my Yahoo service and I can no longer access the dashboards etc. So I'm just going to list the high level steps I performed and provide you with the links that I followed. The main link is the first one shown in the References below.The first note at the top of the Yahoo help page is to update the Yahoo naming servers. There are 4 naming servers that you want and these are listed in the Route 53 console.
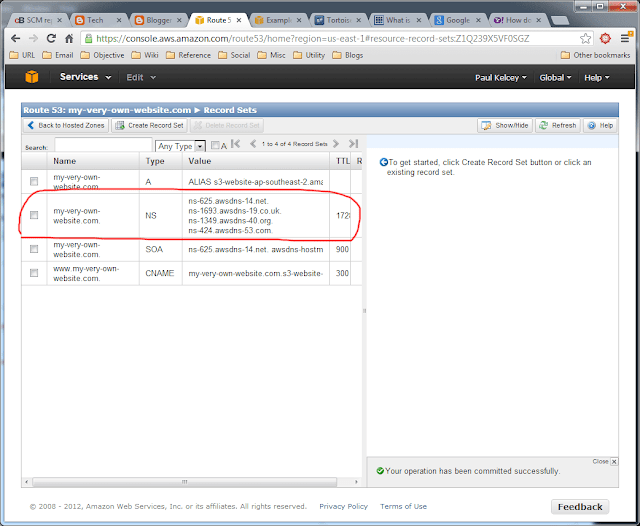 |
| AWS Console - Route 53 - 4 Naming Server Addresses |
After you login to Yahoo you'll eventually find your Domain Control Panel. I found with a combination of Googling and navigating. From the Domain Control Panel you can select advanced DNS options. From there you should delete the two Yahoo naming service references (you can paste them into a text file so you don't lose them if you like) and then add the 4 Amazon naming servers shown above (note that you'll most likely have different addresses to copy and paste).
13. Unlock domain and get authorization code
Do these things in the Yahoo Domain Control Panel. They are both fairly obvious things to be able to do. You need to unlock your domain if it's locked in order to be able to transfer it. Mine wasn't locked to begin with. The authorization code is needed as part of the transfer process (see below).
14. Change admin email address and disable private domain
Again, do these things in the Yahoo Domain Control Panel and again they are fairly obvious things. Change your admin email address to a non-yahoo based one. Once it's been changed you should wait an hour or so to make sure the change has propagated.15. Contact new domain registrar and initiate transfer
At Cheap Domains I needed to pay $7 to extend the domain registration by a year in order to transfer to them. I had no problem with that. Once I initiated the process, I got an email from Cheap Domains requesting authorization to transfer the domain. The thing here is that the email they used isn't necessarily the one that I used to register with Cheap Domains with. It's the email address of the current owner of the domain. The new domain registrar will get the email address from the whois service. That's why you needed to make the domain public and use a non-yahoo based email address (step 14).The email from the new registrar will most likely provide a link back to their web site with a form that enables you to enter in the authorization code you gathered in step 13.
Each registrar will have a domain name dashboard. Once you've initiated the transfer and entered the authorization code, the domain you're moving will appear in the list. Initially it might say something like pending but reasonably quickly it will change to something like 'transferring'. I got the message that it would take up to 7 days to complete the transfer. In the meantime, the Yahoo infrastructure will be pointing to the Route 53 naming servers (we did this in step 12). At the time of writing this, I am currently waiting for the transfer to complete.
16. Update new registrars naming servers for the domain
A new registrar will have it's own DNS naming servers. Once the transfer to the new registrar is complete you need to update the DNS settings for the domain to point to the same Route 53 naming servers we used in step 12. I'm not sure whether this will happen automatically as part of the transfer process or not (I suspect not) and as such I expect I'll need to do that. I imagine that there will be a window of time for me to do that based on the TTL of the naming servers (i.e. clients will continue to go to the Yahoo naming servers for a period of time after the transfer has occurred).17. Cancel your Yahoo service
After googling for a while I eventually found the link to cancel the Yahoo service. Interestingly (and quite different from the self-serve nature of AWS) you have to actually call someone to cancel the service. I wasn't that keen on that to be honest. The customer service representative explained that this was because people didn't read instructions first and invariably found themselves in trouble. By making the customer call, it enabled Yahoo to double check that everything was in order before they customer transferred so they didn't lose data etc. I can understand that but at the same time I prefer the self serve nature of Amazon. Sure you can screw things up by mucking around but everything is within your power and you're not paying for anything you don't need (such as customer service). I'm not saying that Amazon doesn't have customer service, I'm sure they do and I'm sure they'll help you out if you screw up, I'm just saying I like the fact it's not forced on you and as a result you get a nice price point.Anyway, that's the bulk of the posting. The remaining steps are if you're also transferring e-blogger sub-domains (which you would have had configured at Yahoo).
18. Hooking up e-blogger sub-domains (optional)
In order to do this you need to go to blogger.com and go to the settings section of the blog you want to have hosted at a sub-domain of your web site (e.g. my-blog.my-very-own-website.com).There's an option there to set the blog address (under publishing). If you click the edit tab then you can select advanced options and specify the sub-domain you want (e.g. my-blog.my-very-own-website.com). When you do this, blogger.com will complain that you need two CNAME entries in your DNS provider. One which maps from my-blog.my-very-own-website.com to ghs.google.com and another that maps from {a bunch of random characters}.my-blog.my-very-own-website.com to a big garbled URL.
Go to Route 53 and add those two records in as CNAME records and then go back to blogger.com and retry. It will work this time and when you go to my-blog.my-very-own-website.com you'll see the blog.